
Introduction
Containerized apps have been on everyone’s lips for a while now, and it’s no surprise, they can be very useful. This article will show you how to build and deploy your Dockerized app seamlessly into an Azure App Service.
For this guide I have created a demo environment where the Dockerfile is already set up and ready to go, an Azure Container Registry (ACR) has been created (Basic SKU for this demo), I’ll use ACR; however, there are multiple options for container registries that can be used. And the project’s code is allocated in a private Azure DevOps repo.
Create and Configure The App Service
First, we’ll create the App Service in the Azure Portal. You probably already know how to create a new resource in the Azure portal, but I’ll quickly show you how to do it. First, you need a Resource Group, then on the home page you can select “Create a resource”, then “Web App” and fill out the options.
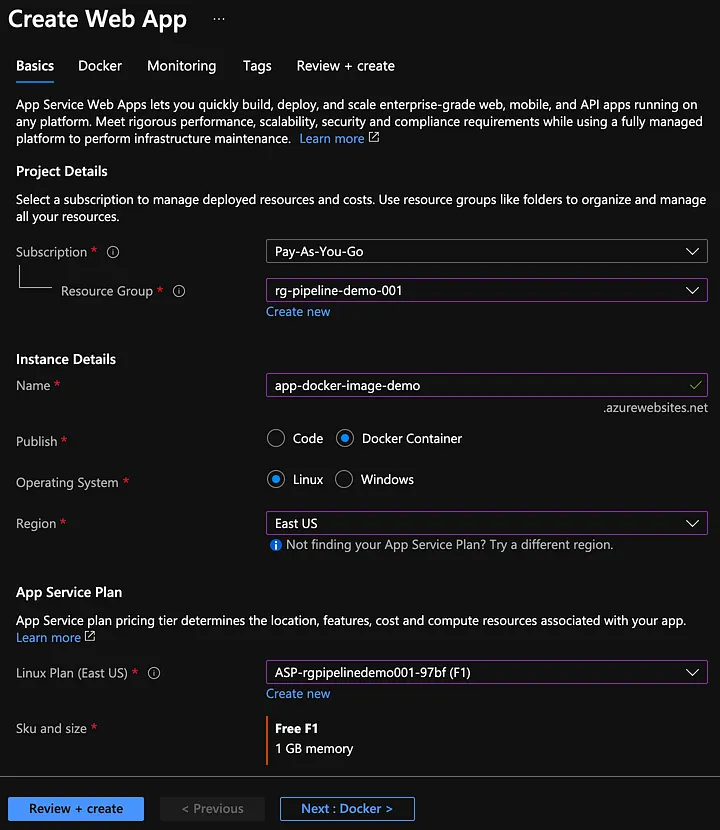
Create Web App
Select the subscription where you want the App Service to live in, set a name and a region, create or use an existing App Service Plan, and make sure you select “Docker Container” in the Publish option. Select the correct operating system, whether your base image is Linux or Windows.
If you click on “Next: Docker” you can configure the App Service to get the image from ACR, but we’ll skip it and click on “Review + Create” and in the summary page click on “Create”.
Azure will create an App Service with a default application that is being pulled from a Microsoft Container Registry.
In the App Service, under Deployment, select “Deployment Center”. There you’ll be able to see logs about the image being pulled from the container registry and executing “docker run” to start the application. Also, in the “Settings” tab you can see the current container registry configuration, there you can manually configure the container registry to be used, but we’ll use pipelines for that in this guide.
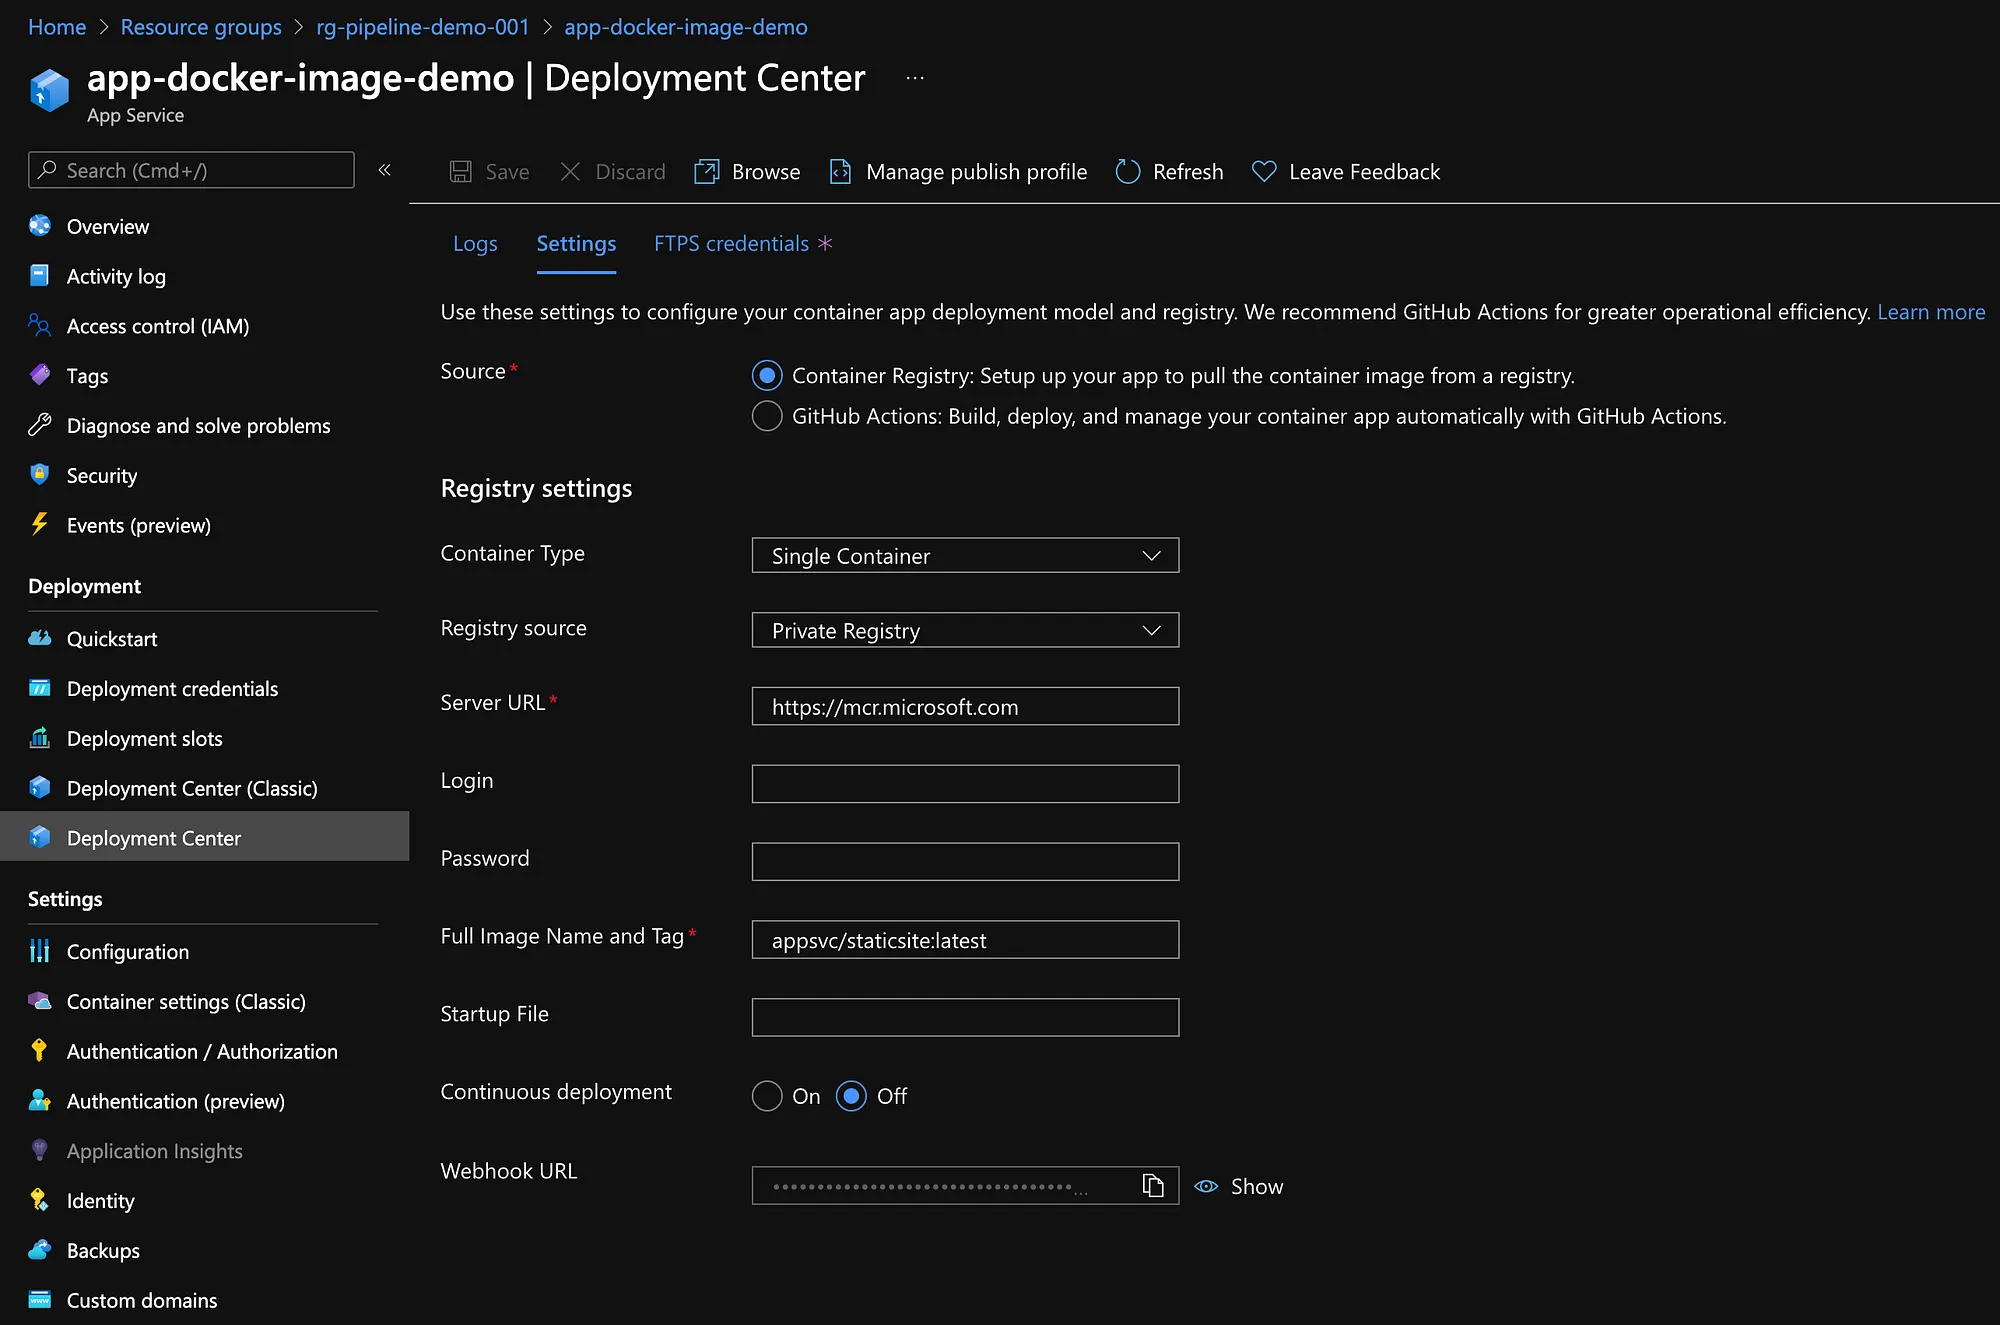
Web App container registry configuration
In a scenario where we have our ACR and App Service in different subscriptions, we must enable a managed identity for the App Service. Go under the “Settings” section in the App Service left side menu, click on “Identity” and change the “Status” toggle to “On”. We’ll work with a system-assigned managed identity for ease of use. If we have the ACR and App Service under the same subscription this step is not required.
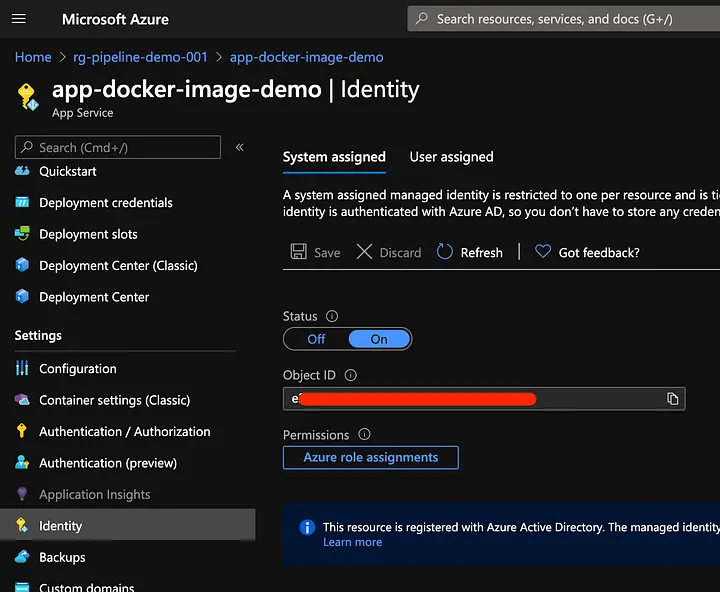
Enable system-assigned managed identity
Continuing with the scenario where we have the two resources in different subscriptions, in ACR we must assign the “AcrPull” role to the managed identity we just created for the App Service. After doing this it will be able to pull docker images from ACR. To do this go to ACR in the Azure portal, “Access control (IAM)”, “Role assignments”, “Add”, “Add role assignment”, select the role and managed identity we just created, and click “Save”. Again, in the scenario where the two resources are in the same subscription, this step is not required.
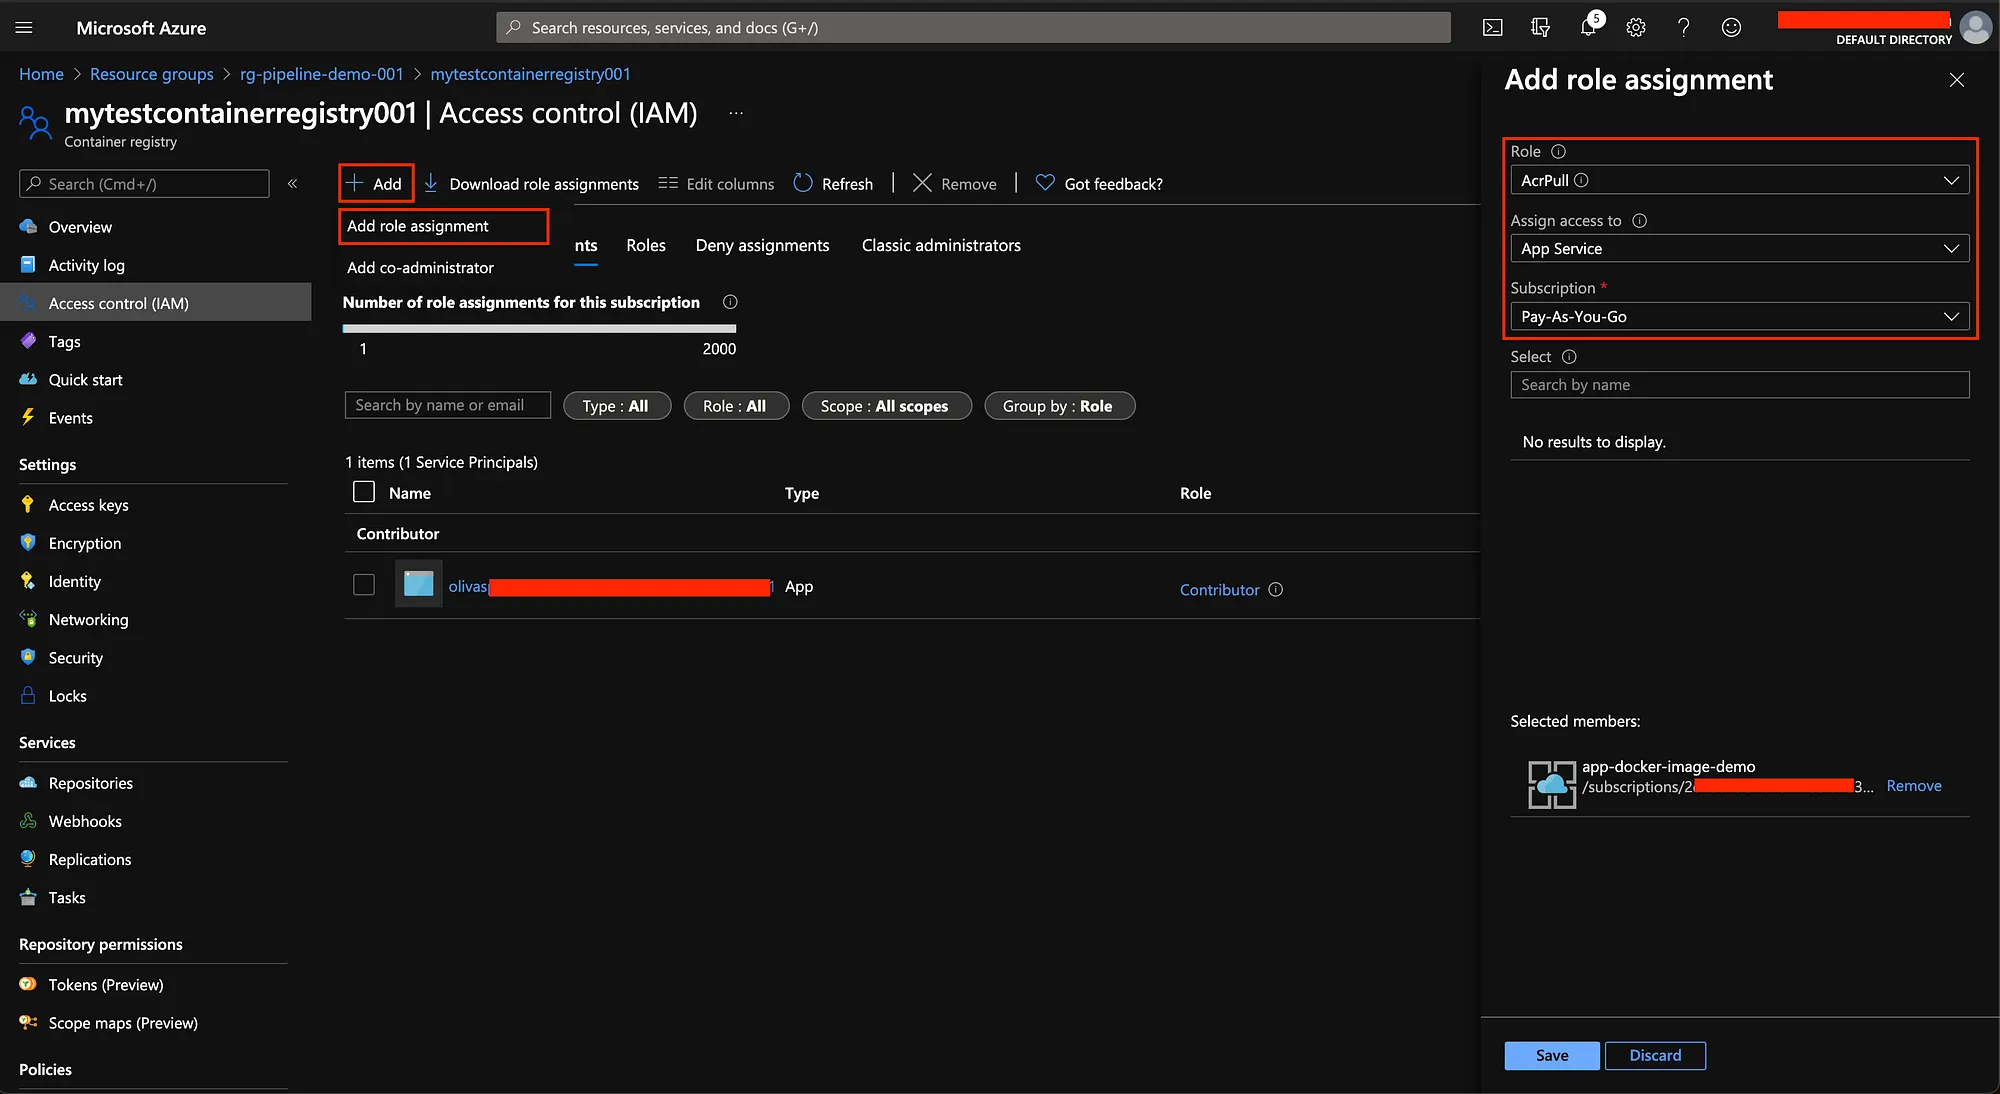
Assign “AcrPull” role to the App Service managed identity
There is one more thing that we need to set in ACR. Go to ACR, in the Settings section select “Access keys” and enable “Admin user”. This will give us a username and a password to authenticate to ACR and pull the image from it, we’ll use these values in the release pipeline. This is also required to log in to our ACR and push docker images to it from our local environment.
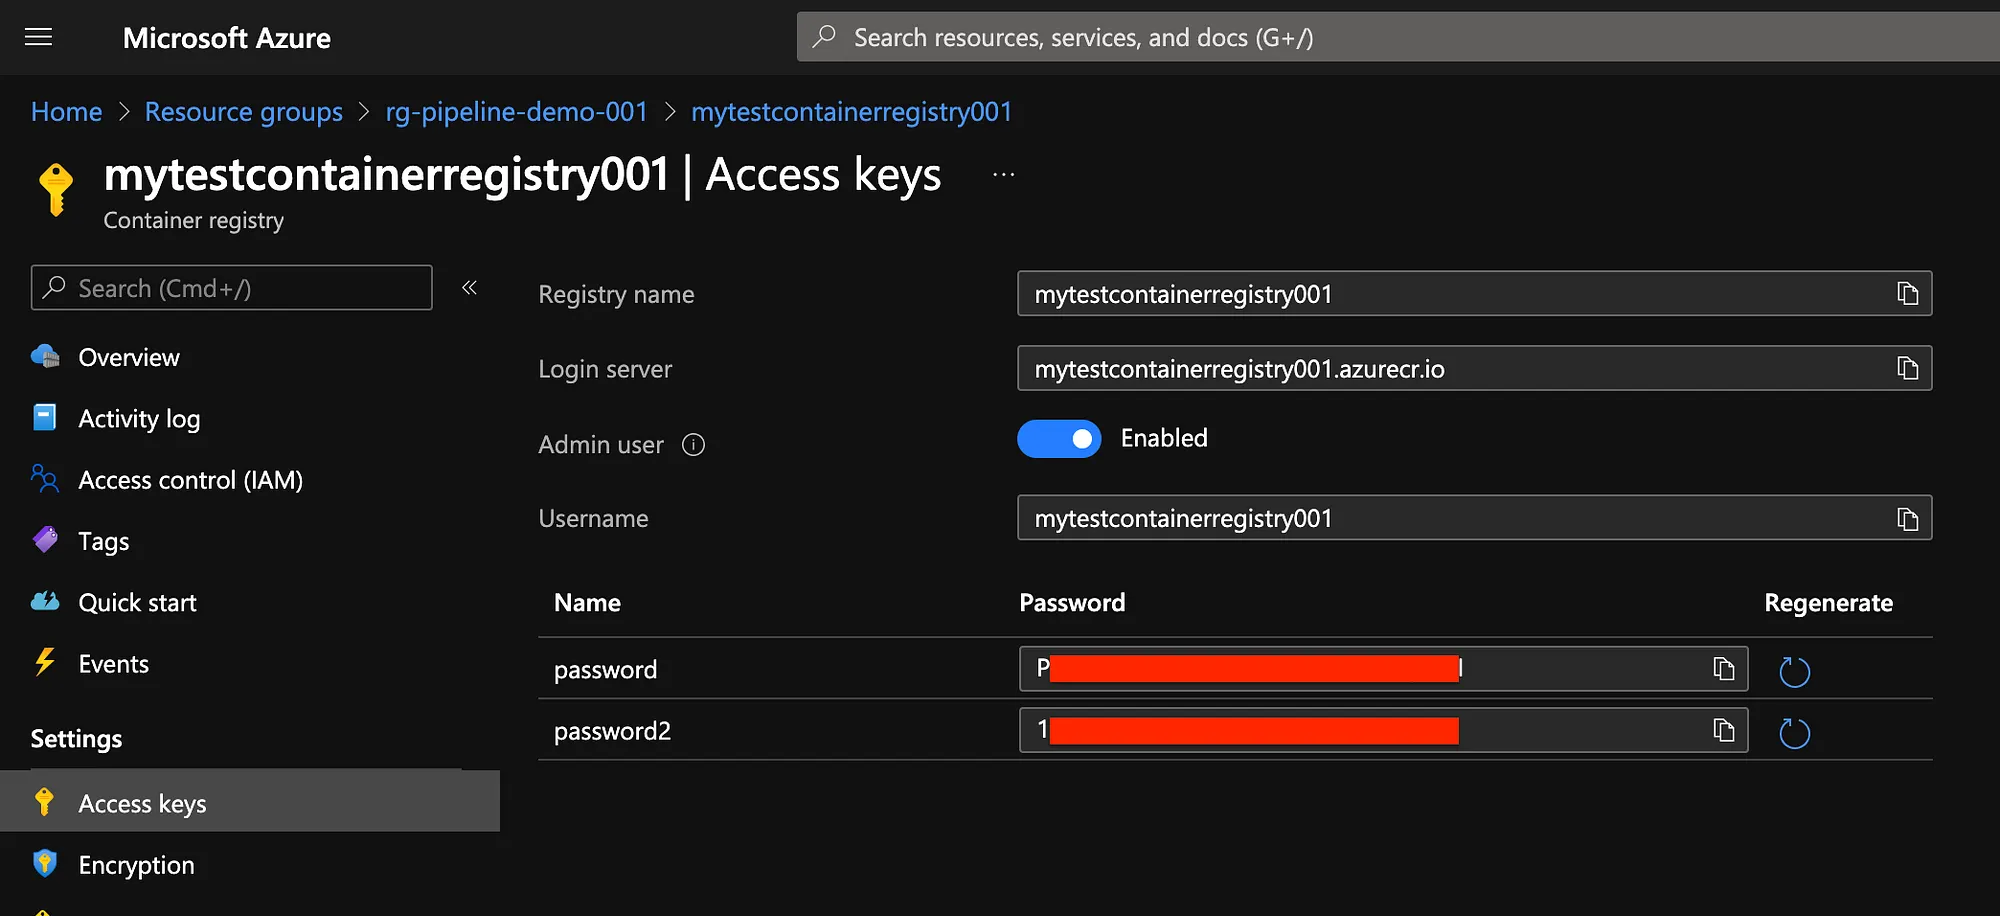
Enable Access keys for ACR
Alright, now we are ready to start setting up the pipelines.
Setup a CI Pipeline
Now, let’s set up a CI pipeline using YAML to build the Docker image and push it to ACR. For this pipeline what we need is very simple. Here is the YAML file:
trigger: none
pool:
  vmImage: ubuntu-18.04
name: "$(Date:yyyyMMdd)$(Rev:.r)"
jobs:
  - job: job_1
    steps:
      - task: Docker@2
        inputs:
          containerRegistry: 'my-acr-service-connection'
          repository: 'demo-app'
          command: 'buildAndPush'
          Dockerfile: '**/Dockerfile'
          tags: '$(Build.BuildNumber)'
We are setting the pipeline to have no triggers for the sake of this demo, meaning it can only be triggered manually, but you can configure it to trigger whenever there is a change to a specific branch. We are running it on an ubuntu agent, a custom build number is being set in the “name” instruction, and we are defining one single task to build and push the docker image to ACR. To be able to push the image to ACR we need to have a working “Docker Registry” service connection configured for the ACR service that we want to use.
Set up a CD pipeline
Here we’ll use a Release Pipeline in Azure DevOps. Simply create a new Release pipeline, choose to start with an empty job, go to the tasks of the stage created by default and search and add a task called “Azure Web App for Containers” and fill out the fields with the required information, you’ll need a working service connection for the subscription where the App Service lives in.
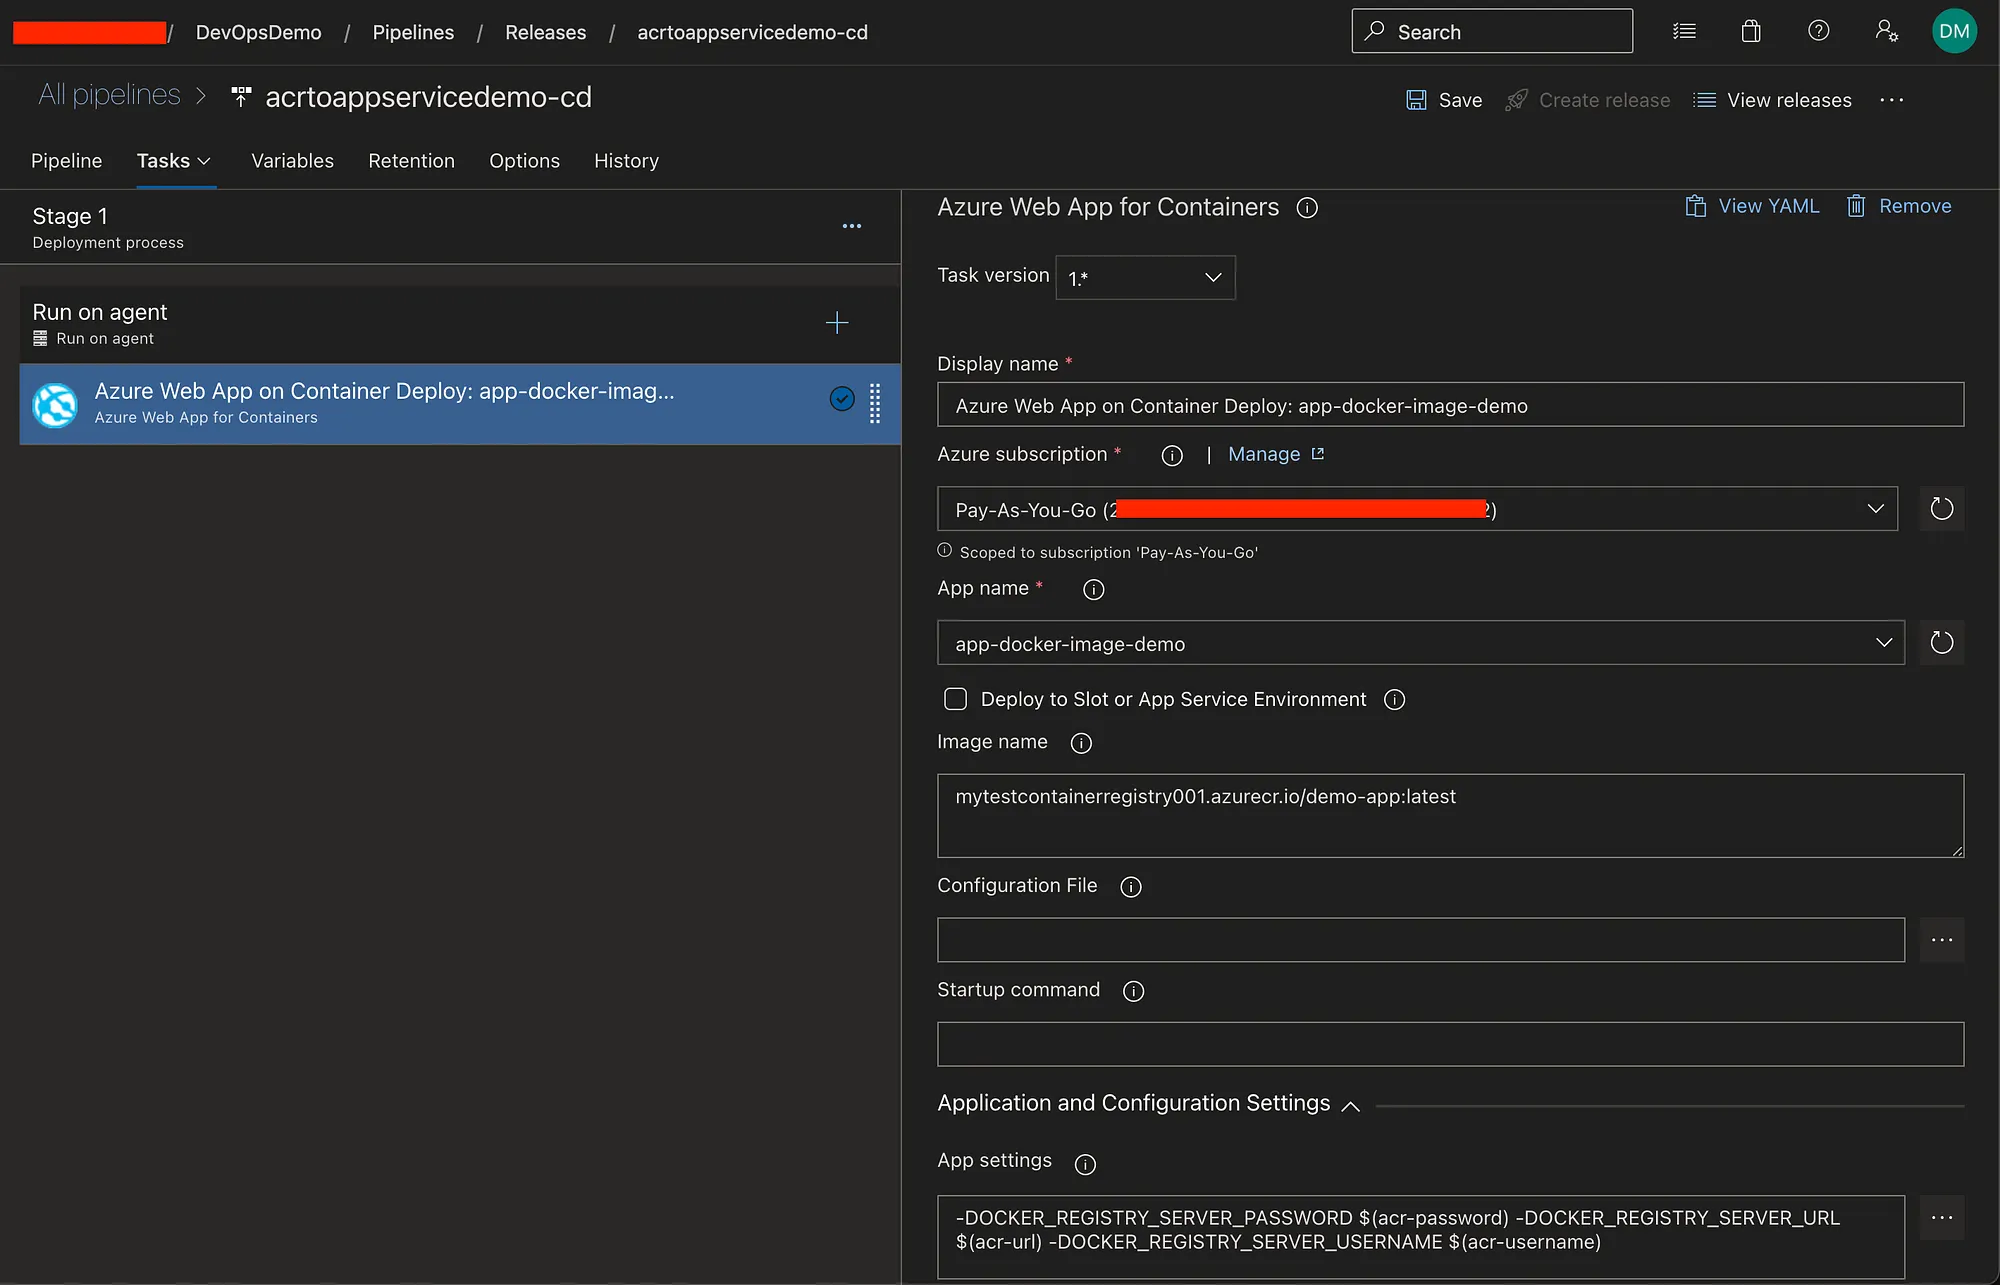
CD pipeline setup
Please notice that the docker image name must include the full container registry name (<acr-name>.azurecr.io) and the image name and tag. Also, I set the app settings values for “DOCKER_REGISTRY_SERVER_PASSWORD”, “DOCKER_REGISTRY_SERVER_URL”, and “DOCKER_REGISTRY_SERVER_USERNAME” to make sure the App Service is always pulling the image from the right registry and has the right credentials to do so. This is where we’ll use the credentials we enabled before in ACR. Make sure that the “DOCKER_REGISTRY_SERVER_URL” setting has the next format https://<acr-name>.azurecr.io.
That is all the setup we need to make our pipeline work. Additionally, you can add the build pipeline as an artifact, enable triggers to run after the build pipeline completes, deploy to a slot and swap it, set the image tag as a variable, etc. There are many other configurations you can make, but for this demo, we’ll simply add the task to deploy the image to the App Service.
Another option for continuous deployment is to turn on the “Continuous deployment” setting in the Deployment Center Settings in the App Service. If it is turned on, every time the image is updated in ACR it will update automatically the App Service. I prefer to set up a CD pipeline to have more control over when the new version is going to be deployed.
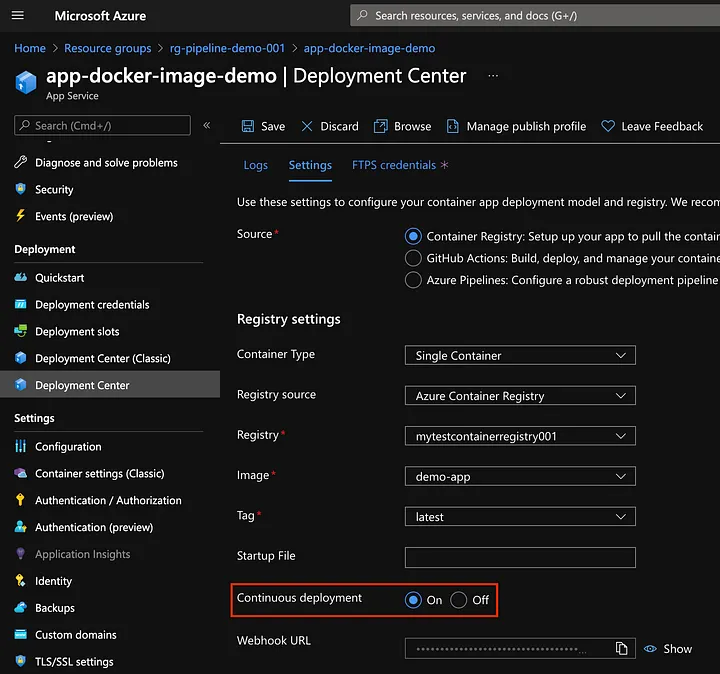
Enable continuous deployment in the App Service
Side Note
Working on an image for a Node.js application I used an Alpine Linux base image, everything was working fine. The problem was when trying to run the image in the App Service, I kept getting a permissions error about the ports the App Service uses, 80 and 443.
To solve this I needed to give permissions to use ports below 1024 to the non root user that I was setting up in the Dockerfile to run the application, I used “setcap” to achieve this. My Dockerfile ended up looks something like this:
# Image for 64-bit systems
FROM node:8.9.4-alpine

# ...

# Install setcap package
RUN apk update
RUN apk add libcap

# ...

# Give access to the ports below 1024 to non-root users
RUN setcap 'cap_net_bind_service=+ep' `readlink -f \`which node\``

# Create a non root user to run the app...

# ...
Please notice that the “setcap” command is run before creating the non-root user because it must be run by the root user. Another solution to this issue is to expose a different port higher than 1024.
Conclusion
Being able to deploy a docker image from ACR to an App Service is pretty cool and it is very convenient when you have a Dockerized application. Here I showed a couple of options to set up a continuous deployment flow, you can implement the one that better adapts to your needs.
I hope this article is useful to you. If you have any questions or comments about this quick demo please feel free to post it.