
Introduction
Static code analysis is very useful to detect security issues and bad code practices in our projects. SonarCloud is a great static code analysis tool that can be easily integrated into Azure DevOps. It can be used for free in public Azure DevOps projects.
Without further ado, let’s get started.
Assuming we already have an Azure DevOps organization and a SonarCloud account, the first step is to associate our Azure DevOps organization with SonarCloud. For this, we need to create a Personal Access Token (PAT) in Azure DevOps.
Click on the user settings icon on the top right corner in Azure DevOps, then “Personal access tokens”. That will take us to a page where we can see an option to create a token. Clicking on “New Token” will show us a form we need to fill out to generate a new PAT.
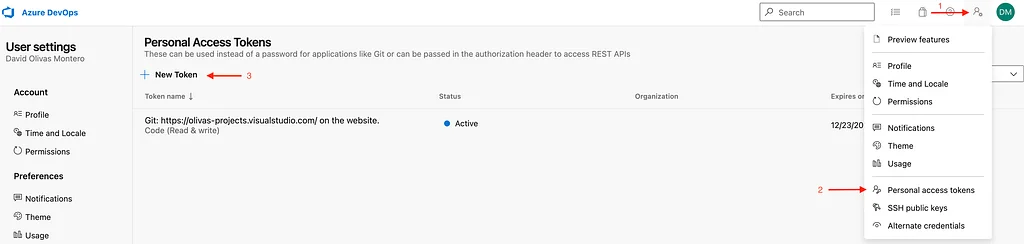
Create a Personal Access Token in Azure DevOps, part 1.
We must set a name for it, the organization it belongs to, an expiration date, and for SonarCloud we only need the “Code (Read & Write)” permissions, always keep in mind the principle of least privilege when giving permissions for anything.
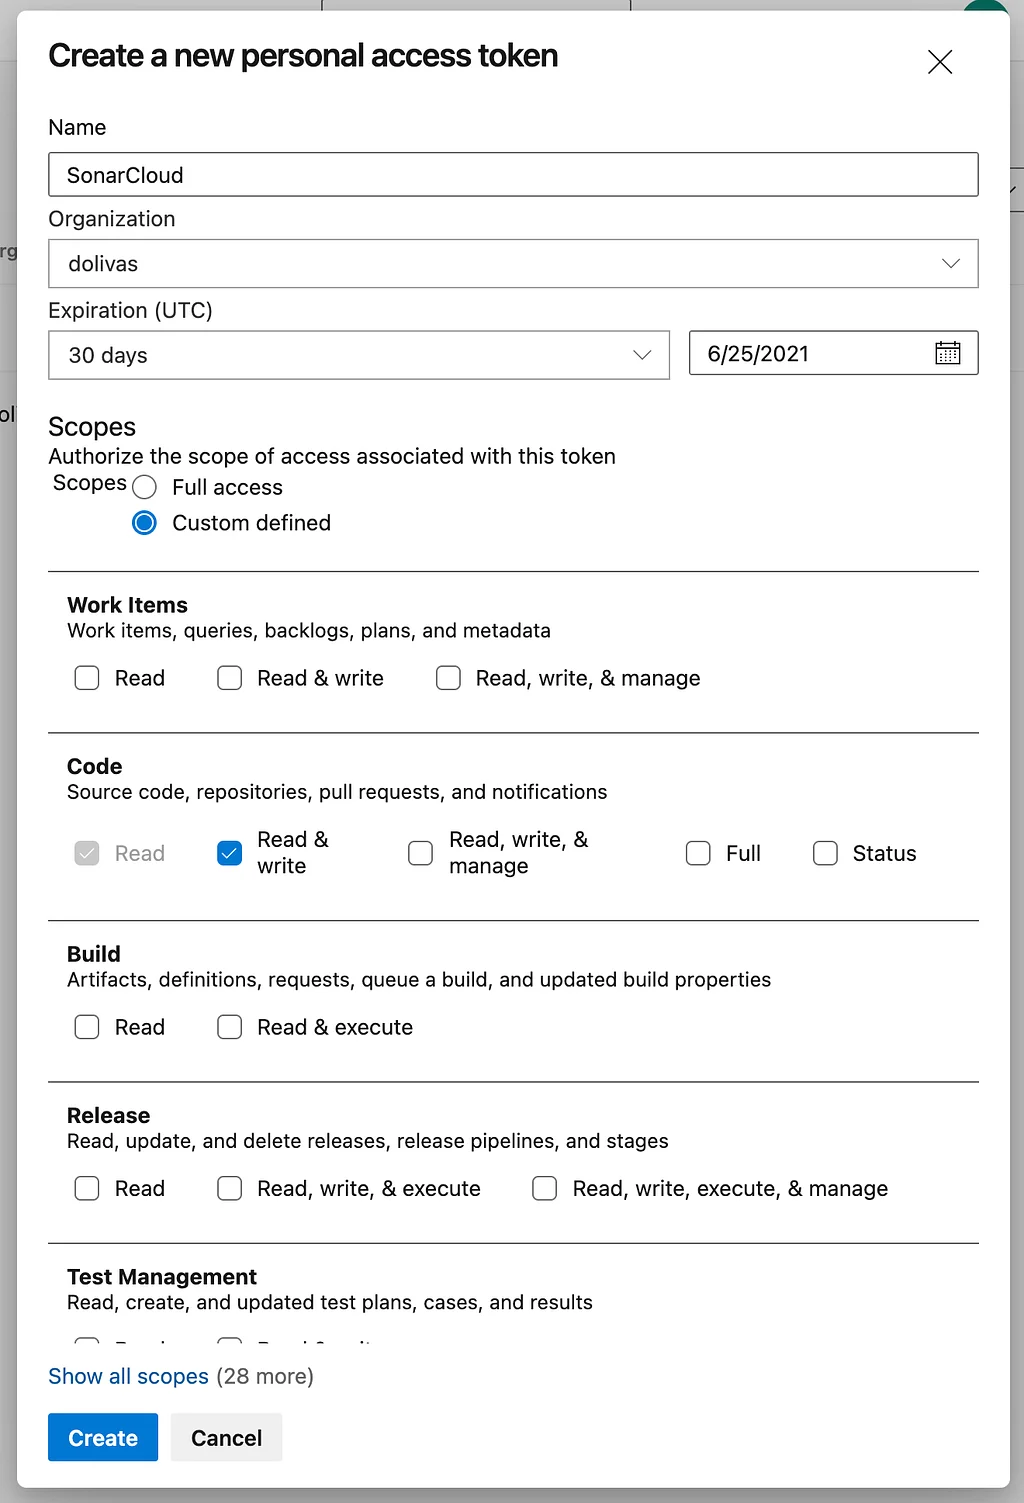
Create a Personal Access Token in Azure DevOps, part 2.
After clicking on “Create” we’ll see the actual token, this is the only time we will be able to see the token, make sure to copy it and save it in a safe place.
Now that we have a PAT, it’s time to start setting things up in SonarCloud.
In the SonarCloud portal click on the plus icon on the top right corner, then click on “Create new organization”. This will show us the required steps to associate our Azure DevOps organization.
We simply have to follow the steps that SonarCloud displays. Set the organization name as it is in Azure DevOps, paste the PAT we created, and click on “Continue”.
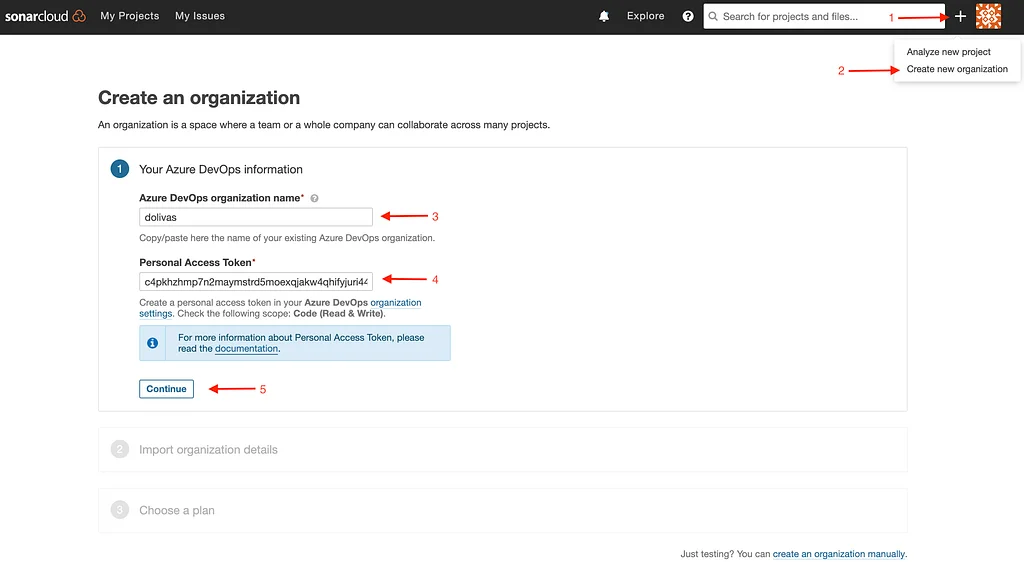
Add an Azure DevOps organization to SonarCloud, part 1.
Now we set a key to identify our organization, it can be anything. We’ll use the organization name and click on “Continue”.
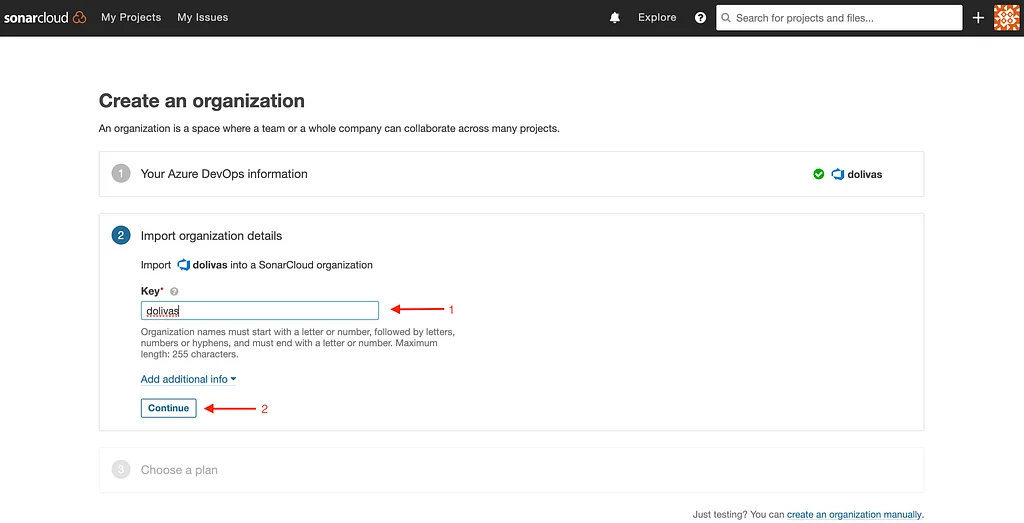
Add an Azure DevOps organization to SonarCloud, part 2.
We have to choose a plan. We’ll choose the free plan since we have a public project in Azure DevOps, and click on “Create Organization”.
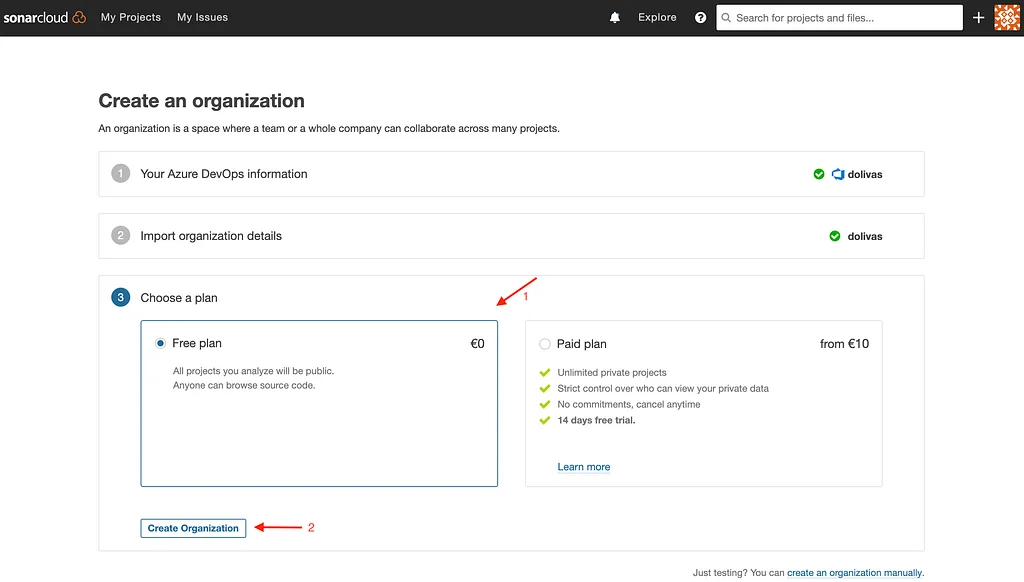
Add an Azure DevOps organization to SonarCloud, part 3.
Now that our Azure DevOps organization is associated with SonarCloud we can set up a project. Click one more time in the plus icon on the top right corner of the SonarCloud portal. Now click on “Analyze new project”, since we only have one organization it will be selected by default, but if we had more organizations we could choose between them. A list of all the projects that we have available in the organization will be displayed, we’ll select the project that was want to analyze and click on “Set Up”.
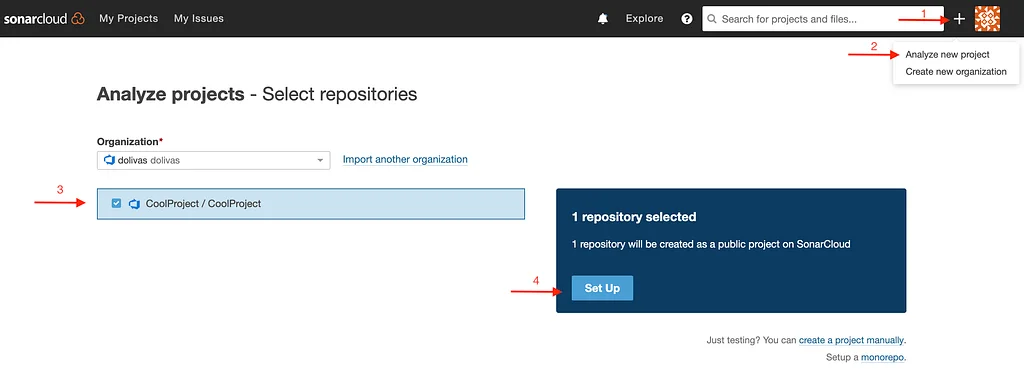
Create a new project in SonarCloud.
Great, we have our Azure DevOps organization associated with our SonarCloud account 🎉. There are still a few more things to do before we can use SonarCloud in our pipelines. We must install the SonarCloud extension for Azure DevOps, create a service connection, and then we’ll be able to add the SonarCloud tasks to our pipelines.
Installing an extension is very simple if we have the correct permissions, if we don’t then we can submit a request for the Azure DevOps organization administrator to install it for us. Either way, we must go to the Visual Studio Marketplace, look for the SonarCloud extension and click on “Get it free”.
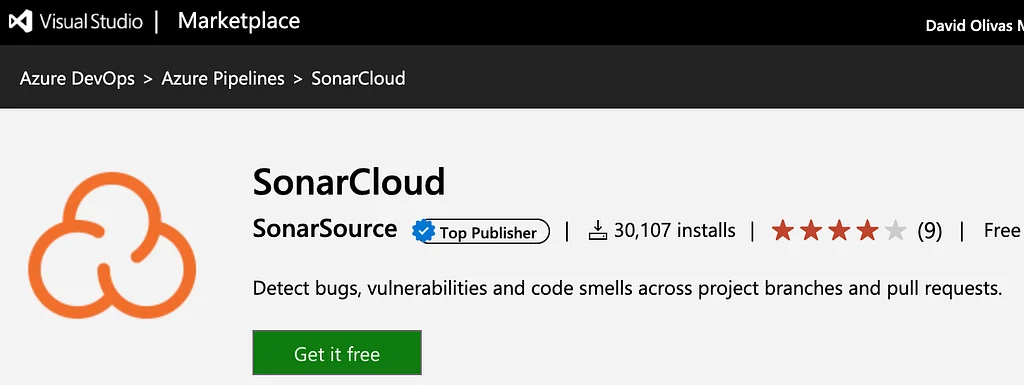
SonarCloud extension for Azure DevOps.
Then select the organization where we want to install the extension and click on “Install”. If we didn’t have enough permissions to install the extension ourselves, here we would see a textbox to input a message to request to the organization admin to install it for us.
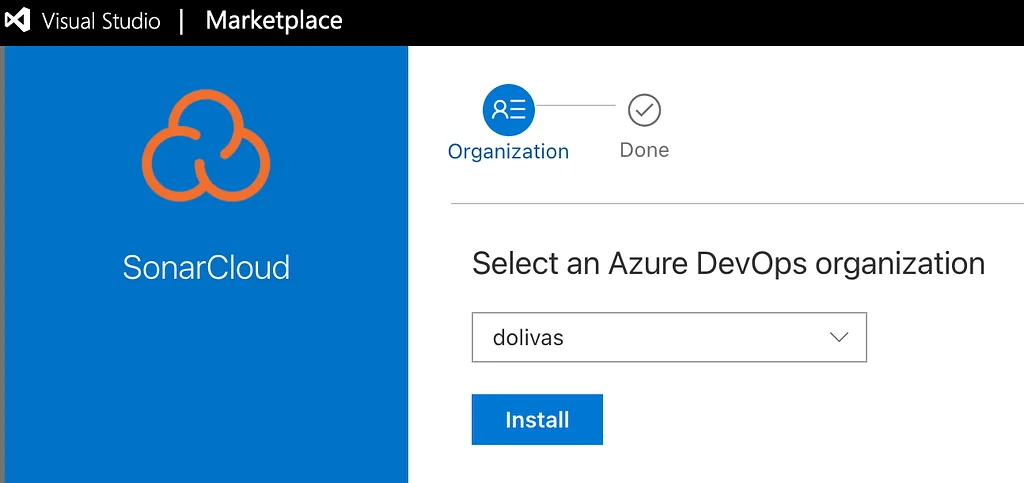
Install SonarCloud extension for Azure DevOps.
That’s it, now we have the SonarCloud extension installed.
In SonarCloud we created a project that has not been configured yet. Since we want to analyze our code from Azure Pipelines, we’ll choose “With Azure DevOps Pipelines” as the analysis method.
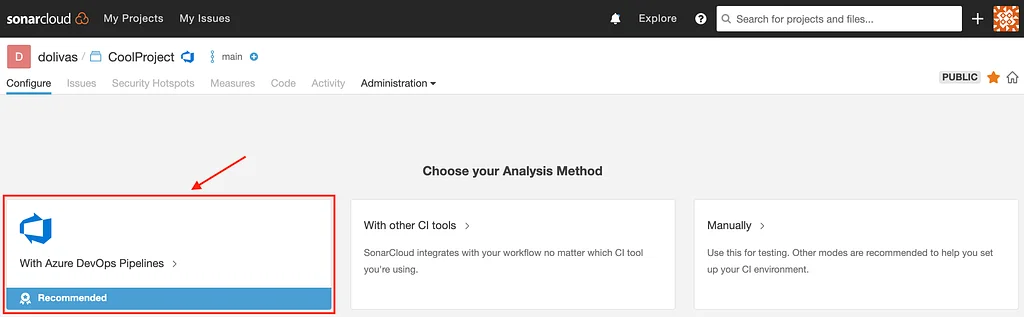
Configuring the project in SonarCloud, part 1.
This will tell us that we have to install the extension, which we have already installed. It will also automatically create a “User Token” that we’ll use to create a service connection in Azure DevOps. Finally, it will show us how to set up the pipeline tasks according to the language that we use in our project. In this case, we’ll analyze a JavaScript app, so we’ll select the option “Other”. It will also show additional information at the bottom for more configurations that can be implemented with SonarCloud in Azure Pipelines.
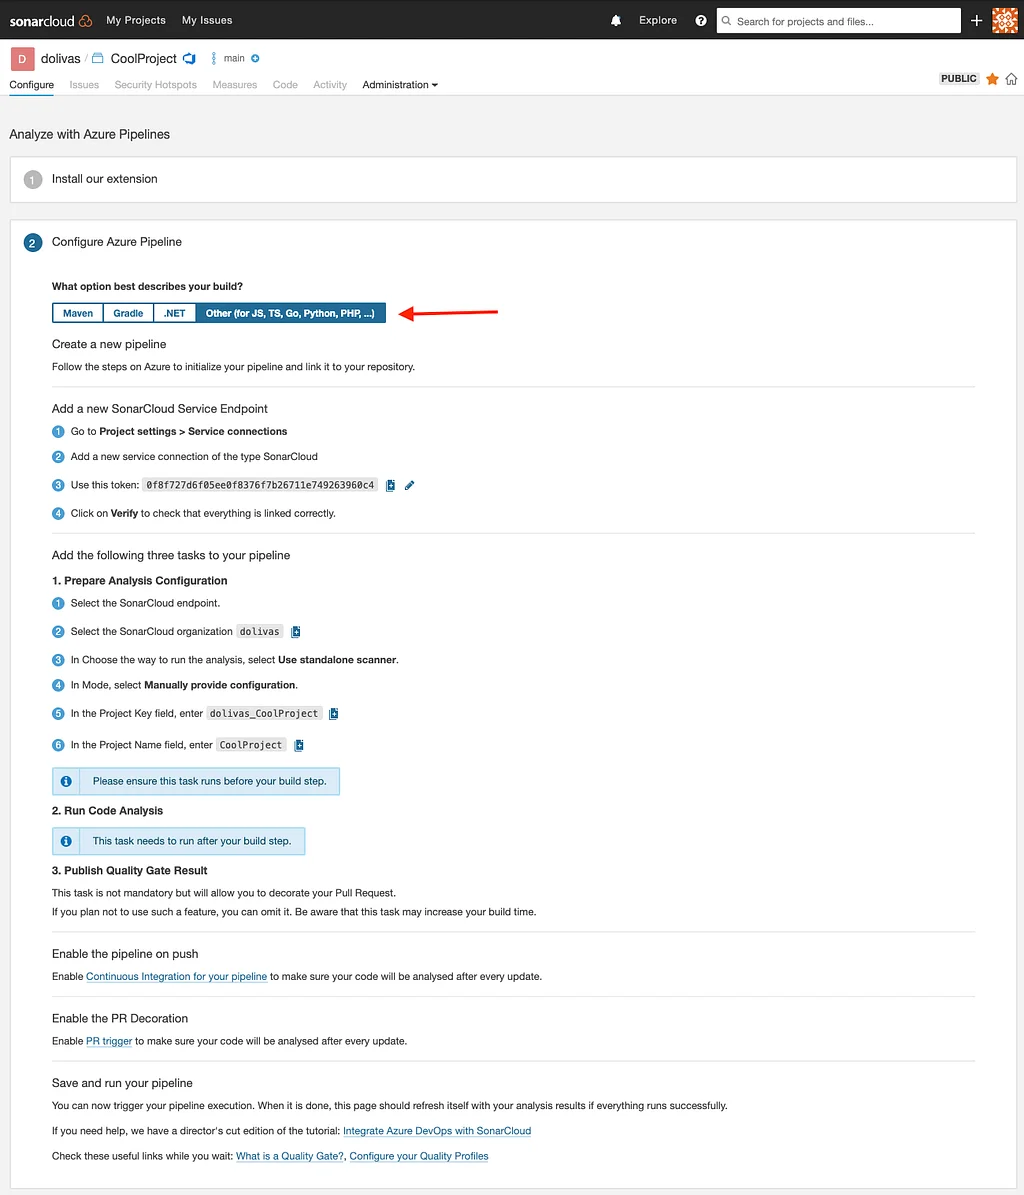
Configuring the project in SonarCloud, part 2.
For us to be able to add the SonarCloud tasks to our pipelines, we must create a service connection. In Azure DevOps, we must go to our project settings, select “Service connections” and we need to create a new service connection.
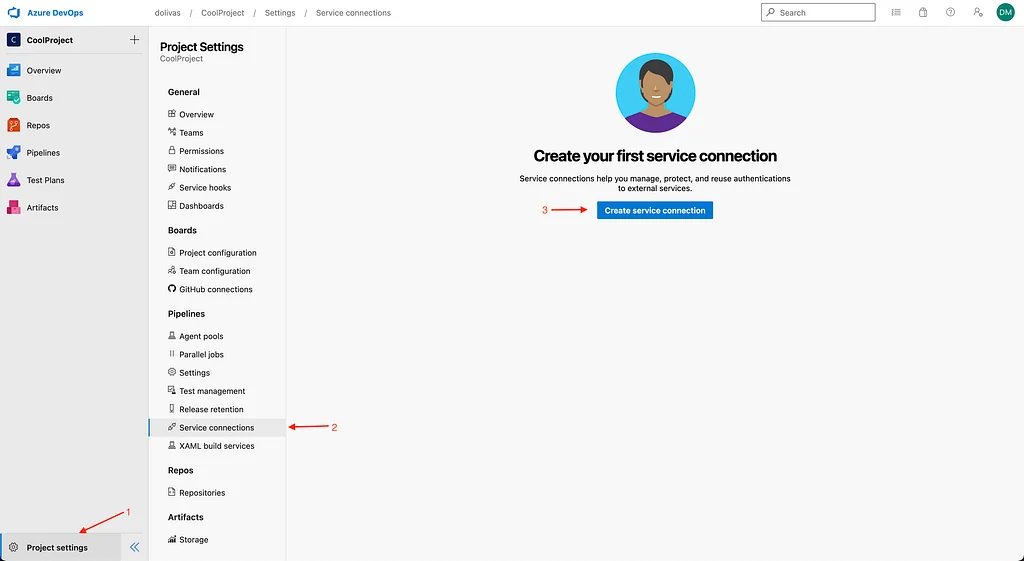
Create a Service Connection in Azure DevOps, part 1.
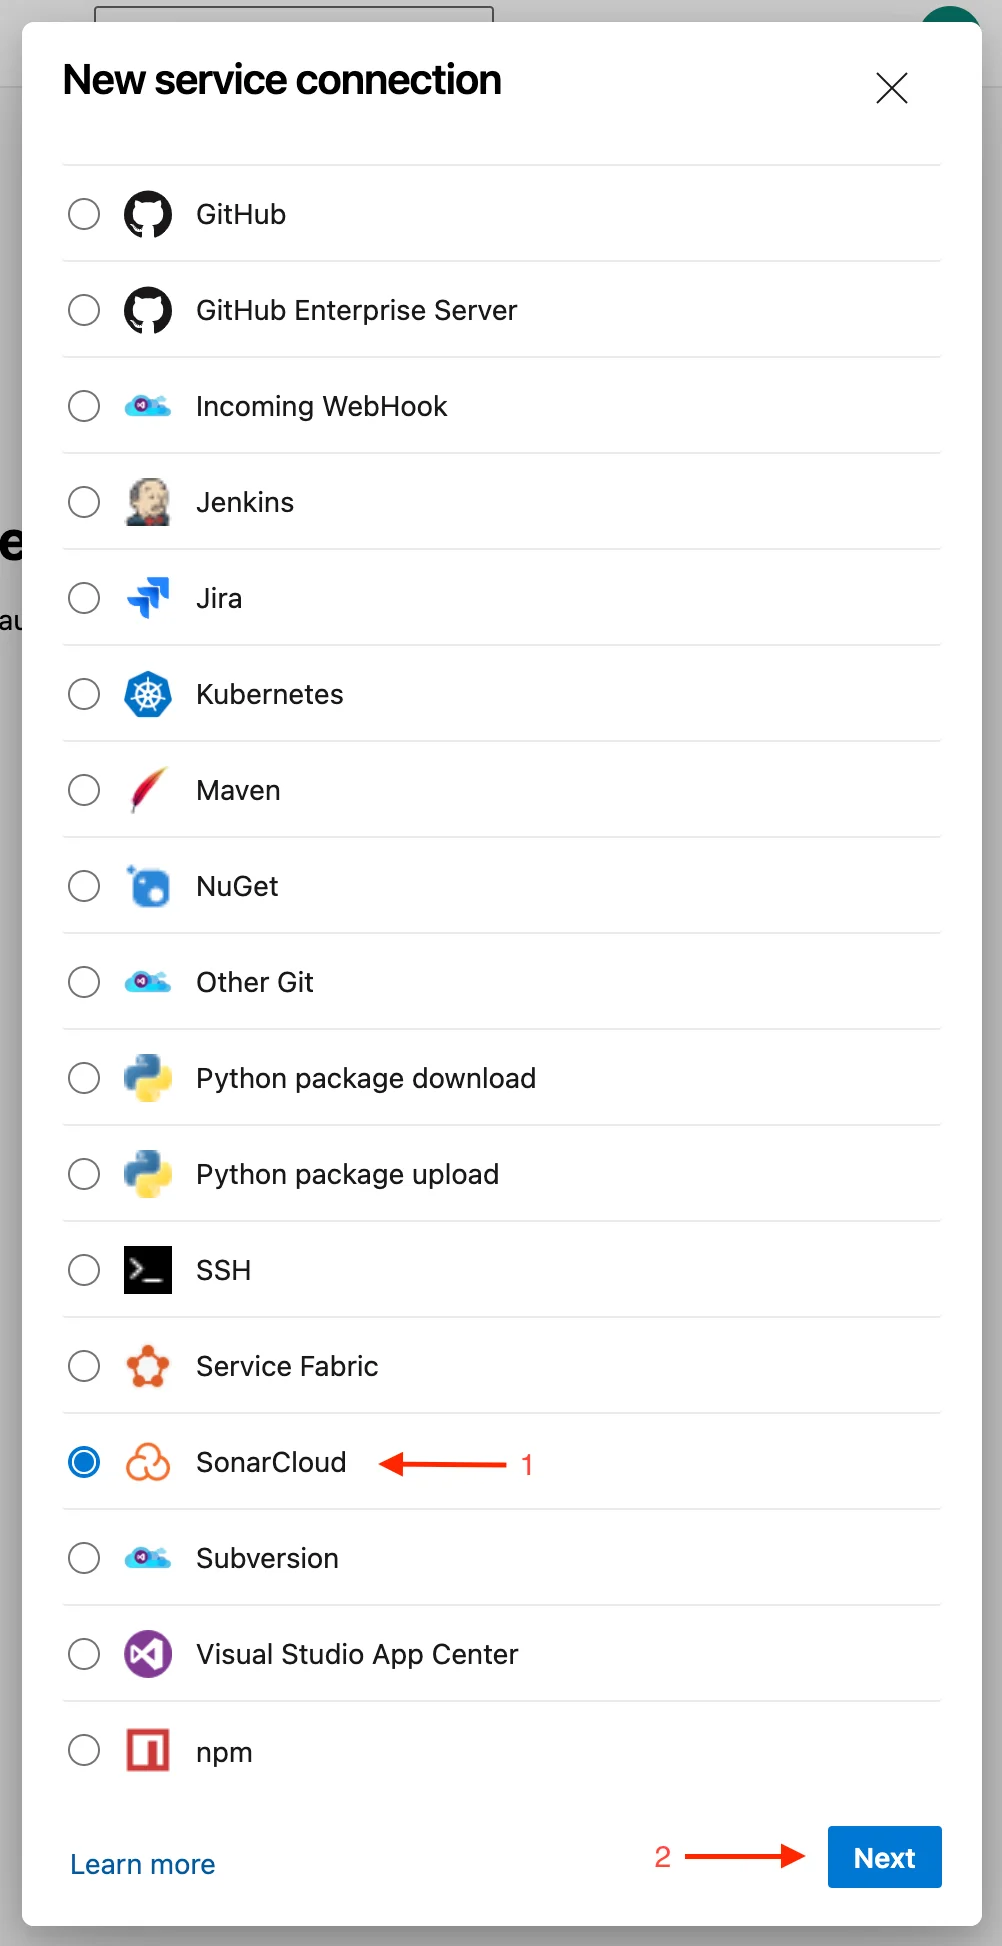
Create a Service Connection in Azure DevOps, part 2.
We have to select the service connection type we want to create, we’ll select “SonarCloud” and click on “Next”.
Select the SonarCloud service connection type.
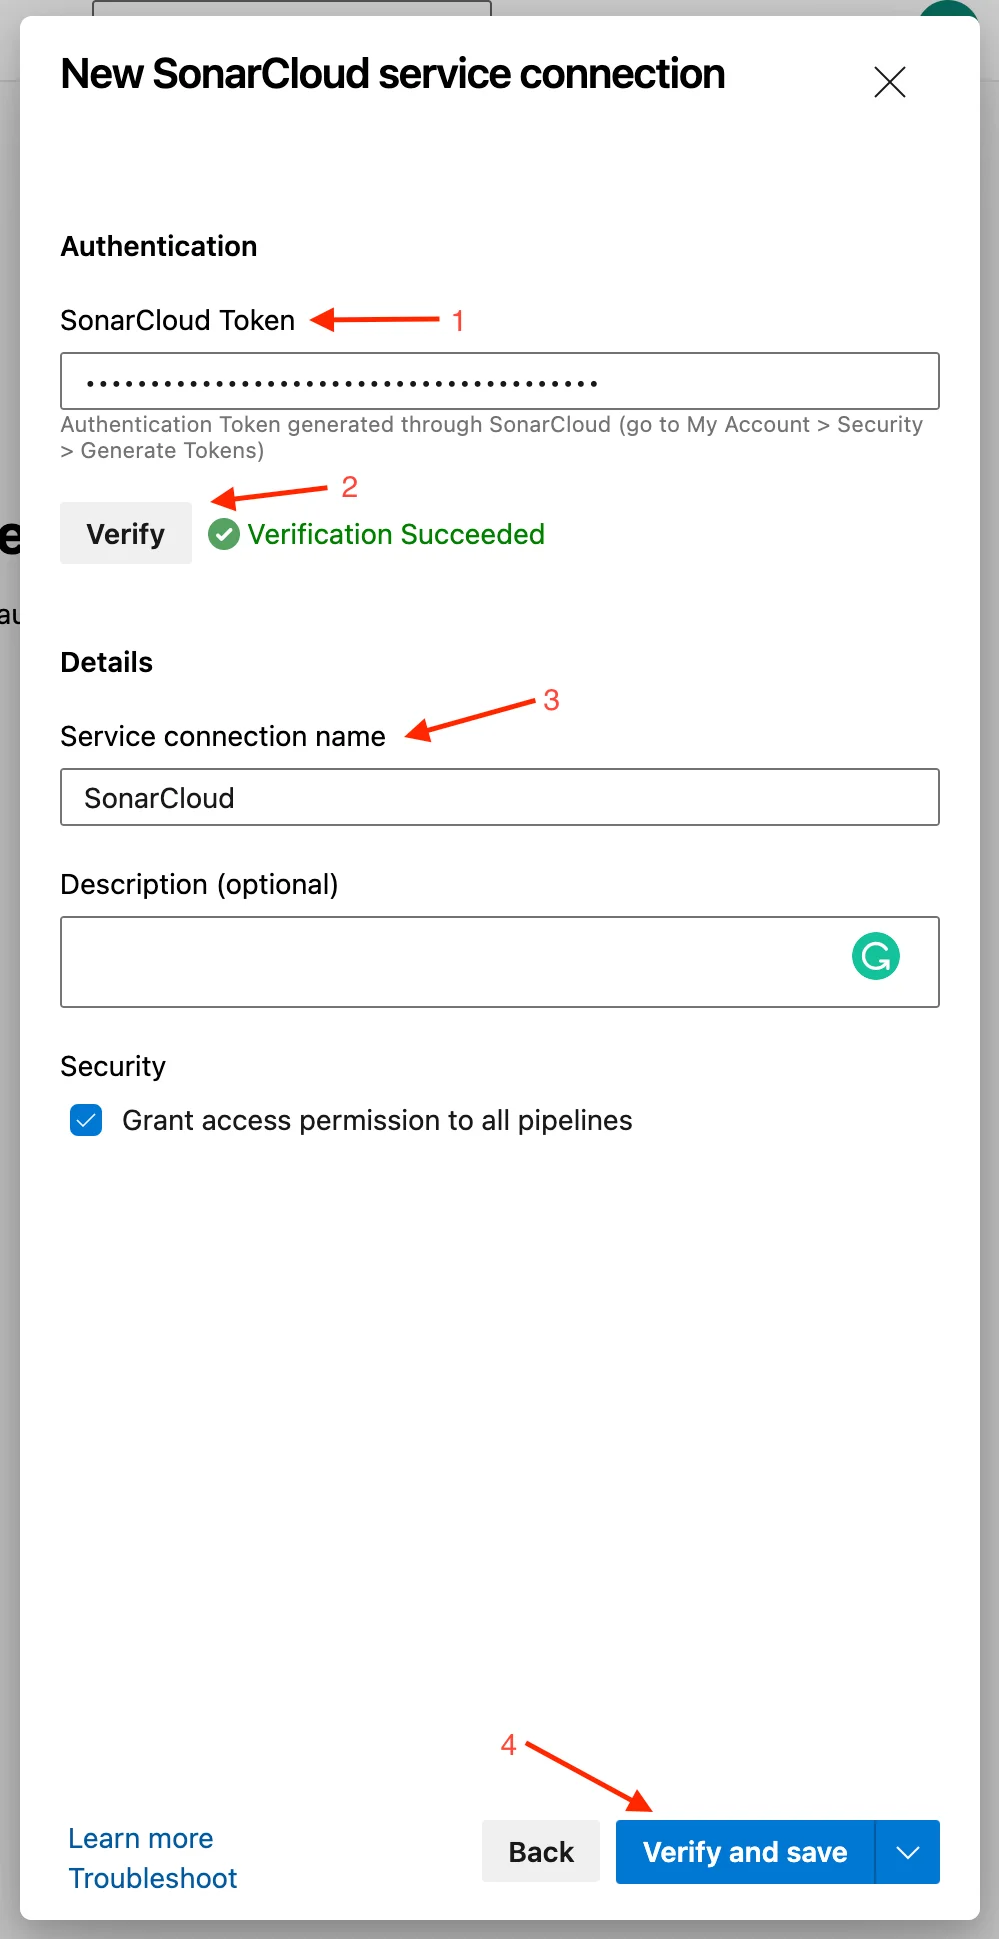
Here we’ll need the user token that was created for us in SonarCloud a moment ago while configuring the project. We’ll paste that token here and verify that it works, we have to enter a name for the service connection and save it. We have the option to grant access permissions for all the pipelines or choose only some specific pipelines, we’ll grant access to all the pipelines for this example.
Now that we have a valid service connection we can start implementing SonarCloud in our pipelines.
To use the SonarCloud tasks in our pipeline we’ll follow the instructions provided when configuring the project.
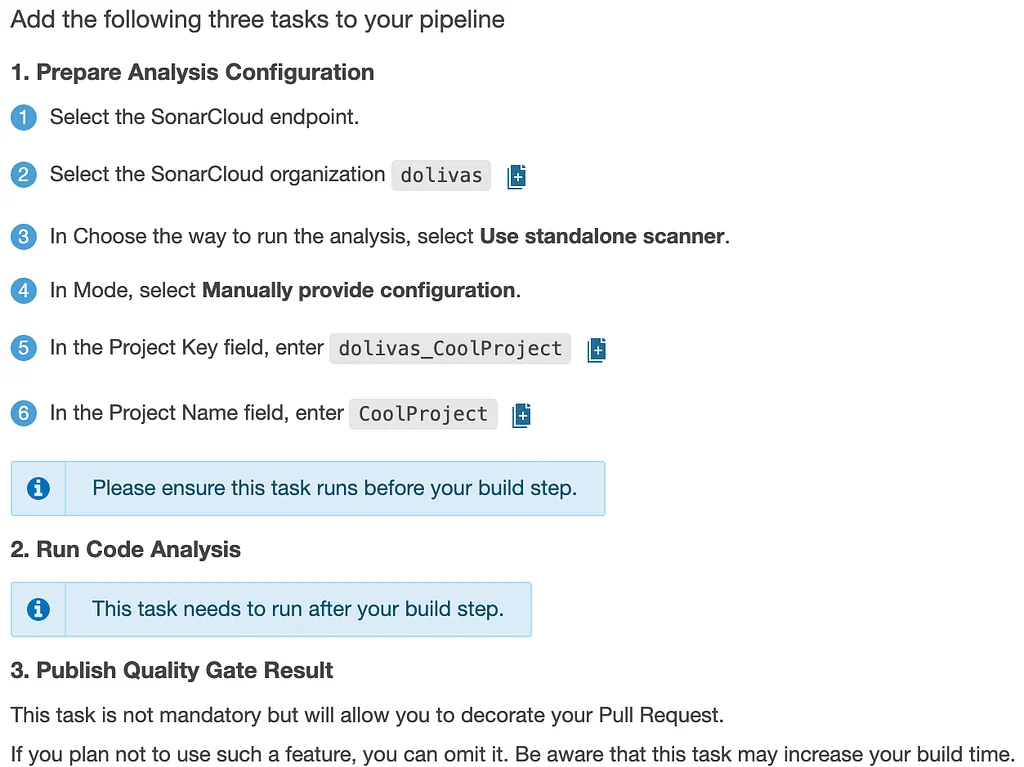
Steps to run SonarCloud analysis from an Azure Pipeline.
In Azure DevOps, we’ll edit our build pipeline to include those tasks. This is what our pipeline looks like without the SonarCloud tasks:
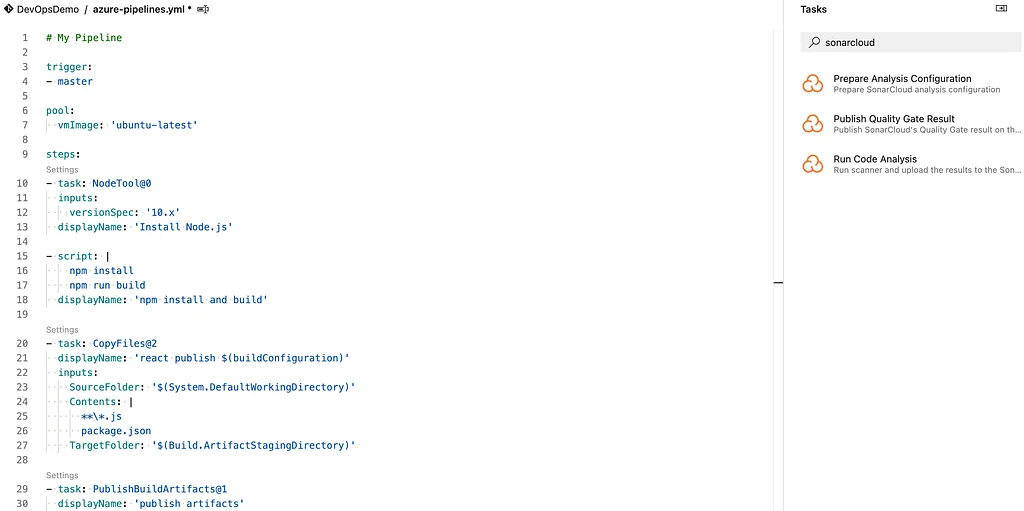
Azure Pipeline without SonarCloud tasks.
This is how our pipeline looks like after following the steps to add the SonarCloud tasks:
# azure-pipeline-sonarcloud.yml
trigger:
- master

pool:
  vmImage: 'ubuntu-latest'

steps:
- task: NodeTool@0
  inputs:
    versionSpec: '10.x'
  displayName: 'Install Node.js'

- task: SonarCloudPrepare@1
  inputs:
    SonarCloud: 'SonarCloud'
    organization: 'dolivas'
    scannerMode: 'CLI'
    configMode: 'manual'
    cliProjectKey: 'dolivas_CoolProject'
    cliProjectName: 'CoolProject'
    cliSources: '.'

- script: |
    npm install
    npm run build
  displayName: 'npm install and build'

- task: SonarCloudAnalyze@1

- task: SonarCloudPublish@1
  inputs:
    pollingTimeoutSec: '300'

- task: CopyFiles@2
  displayName: 'react publish $(buildConfiguration)'
  inputs:
    SourceFolder: '$(System.DefaultWorkingDirectory)'
    Contents: |
      **\*.js
      package.json
    TargetFolder: '$(Build.ArtifactStagingDirectory)'

- task: PublishBuildArtifacts@1
  displayName: 'publish artifacts'
The “SonarCloudPublish” task is not required, but it allows us to decorate pull requests with information from the analysis.
Now we are good to go, that’s all we need to do to analyze our code with SonarCloud in our Azure Pipeline.
Side Note
Public projects in Azure DevOps will no longer have free access to use Microsoft-hosted agents to run the pipelines, starting on February 18th, 2021. This is due to the abusive use of the service using it for crypto mining, and other things, to know more about this check out the official statement here.
We can fill out the form to try to get access to a hosted agent for our public project or set up a self-hosted agent, but that’s out of the scope of this post. The goal of this post is to show how to set up SonarCloud to work with Azure Pipeline.
Final Thoughts
Setting up SonarCloud to work with Azure Pipelines is a straightforward process. However, if this is the first time doing it, then it is easy to get a little lost trying to find the next step. SonarCloud does a great job telling us the steps to follow to configure our project, but it doesn’t cover all the details.
Using static code analysis tools such as SonarCloud can make a big difference in our code’s quality and security, we must try to run this type of analysis in all of our projects. SonarCloud has a Visual Studio Code extension called SonarLint that will help improving code even before committing it.
Hopefully, this post has helped you make your day a little bit easier.